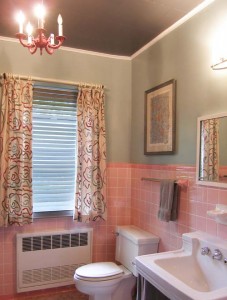
 In the spirit of preserving the past with a contemporary twist, here is the completed update on the Pink Bathroom project. As a quick recap, this idea started with a visit to the Save My Pink Bathroom blog. As it turns out, there is an entire community of enthusiasts fighting to “save” their mid-century pink bathrooms. As Pam describes her mission:
“This little website grew out of mid-century home lovers’ concern that pink bathrooms were being ripped out of post-war American homes way too hastily. How sad it is, to catch a TV makeover show that rips out a perfectly beautiful vintage bathroom… Seems like a bunch of the rest of the world — well behind our curve — actually dislikes mid-century pink bathrooms. They will regret what they have done.”
Often here in Flatbush with our turn of the century homes it was a mid-century decision to “modernize” the bathroom in the newly popular pink color. The tradition of the pink bathroom emerged from the former first lady Mamie Eisenhower, in office 1953 –1961.
Looking at them now, they are totally dated, but with the wrong date stamp for our late victorian houses. Fiscal prudence often dictates embracing the pink bathroom and working with what you have, and I have grown quite fond of mine. It must be the fourth pink bathroom I have had since I started householding. For a low-cost, low-environmental impact project, here are my tips on saving your pink bathroom – or redecorating any bathroom for that matter.
I was missing a few pink bullnose tiles that had fallen out and broken years ago, and pulling the medicine cabinet out of the wall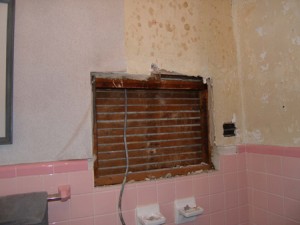 damaged a few more. As per my previous blog on this, I sent one of the samples to Chippy Scaparelli at World of Tile. She sent back 4 tiles that were a perfect match. Thanks to Pam for featuring that tip on her site. My contractor, John Duval, replaced the missing tiles and you can’t tell now which ones they were, it is seamless. I opted to have the contractor regrout the entire bathroom. What a huge improvement, it looked brand new, sharp crisp and clean. Worth every penny, and my contractor was amazing in keeping the mess contained- he wiped down the stairs as he was leaving so it wasn’t tracked all over- I was very impressed.
I discovered that “clear” in powder coating is 1. More expensive and 2. Not clear at all but a weird taupey/gray. It looked awful. The folks at Evernu Metal were kind enough to offer to recoat it in white. It wasn’t what I was going for originally, but it looks fresh and pretty against the bright white new grouting. The inside I painted turquoise, just for fun.
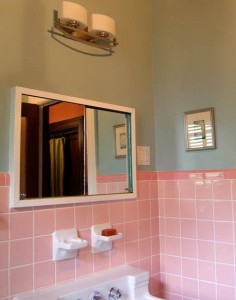 I knew what color I had in mind for the walls, and in the spirit of both thrift and environmentalism, I went down to my shop in the basement and mixed up just the color I needed using various leftover paint samples. Mixing left over paint is a great alternative if you don’t want to discard it or wait for the yearly collection of hazardous waste materials that the city sponsors. If you don’t have any leftover paint from previous projects, go to Build-It-Green NYC, arguably the best source of paint for a low-cost project. They have gallons upon gallons of paint in their Astoria warehouse.. many for $5 a can. They get their supplies donated from surplus construction and renovation projects, so if you can’t re-use your own paint, re-use theirs! (P.S. they also have another location in Gowanus, Brooklyn). Another place with the same ethos is Habitat for Humanity’s ReStore for those of you located in Westchester, Long Island, and beyond.
 The shower curtain and window fabric that I used was made from yardage I had hand screened printed while an apprentice at the Fabric Workshop in Philadelphia after college. The colors worked well with both tile and wall color, and I liked the funky pattern in here- and bonus point, I already had the fabric, and was glad to see it used.
My pink chandelier was up-cycled from a table lamp part that I converted into a hanging fixture, and painted to match the bathroom. The ceiling in the bathroom is dropped and made of some sort of acoustical tile that had seen better days. I had routinely painted it gloss white in the past to freshen it, but I took the opposite tack here and made another “mary mix” paint from the samples stash, and came up with a nice charcoal gray. It looks dramatic, and helps hide the flaws in the ceiling. The dark color seems to make the ceiling float up and away
As with most projects, this one took about twice as much time as initially anticipated. Overall, I am pleased with the outcome and loving my pink bathroom!
Would love to hear your comments on my Facebook page on how you’ve updated your own bathroom with a budget and environmentally conscious approach.
