Decorating Ideas

More Is More

Comments Off on More Is More Written on March 28th, 2012 by
Categories: Decorating Ideas
Tags: , , , ,

Linear PhotosThe blank wall is a problem my clients constantly want help with. Many seem stuck on the idea of finding one huge piece of art to fill a wall. An easy way to sidestep this issue is to take a group of photos or pieces of artwork that you already have and hang them together.

An interesting grouping of pictures reads like one larger piece of art. The way that you hang them can be very dynamic and you can change the look of a wall while holding on to your favorite art or photos by just rearranging the pattern of frames.

Wall Art

My artist niece, Katie pulls this off with her usual flair. Pieces that are fine by themselves are more engaging as part of a larger work. The whole grouping draws you in.

I did a more linear version for a client that allowed me to include a series of antique prints she had framed juxtaposed over a tone on tone stripe.Bedroom


Motor View

Comments Off on Motor View Written on March 23rd, 2012 by
Categories: Decorating Ideas, Olive Green
Tags: , ,

Occasionally I will have a client ask me about motorized shades.  I go to my friend and associate Steve Borodkin at Design Resources for all the answers.  When is it appropriate as a window treatment?

The first time I had even heard of such a thing was when I lived in North Carolina. A good friend of mine had Rheumatoid Arthritis.  When she built her “dream house” she installed motorized windows in her deck gazebo.  There may have been some in the main house as well.  I had helped design some easy-access clothing for Holly because of her disability and knew how daunting everyday tasks could be for someone with her disease. I was glad that technology existed that could help with this routine task that she found challenging.  But I had never really considered motorized windows as something used commonly.  (The new car I bought in 2005 was the first time ever I had automatic windows…Still sort of miss the roll-ups).

Steve rattled off a list of reasons why people would request motorized shades:

*Windows that are hard to reach

*Larger windows where the shade is cumbersome to operate

*Safety- no cords for kids to get tangled in

*Convenience

When you look at the technological advance with remote control access, there is a whole other raft of benefits.  I hadn’t considered that you could more effectively control heat/light by setting your shades to come down or up when you are away.  It can have energy savings as well.

Steve mentions the benefits on his website, Design Resources:

Whether operated based on pre-set times, temperature, light-sensors or centralized programming, motorized systems eliminate the necessity of traveling from room to room and floor to floor to monitor energy consumption.

No longer a luxury item, automated shading systems conserve energy by reducing air-conditioning demands, minimizing and maximizing the sun’s heat, enhance security, and protect your interiors from UV damage.

Today’s glass buildings make motorized shades a reasonable solution for energy savings and light control.  Steve estimates that programmed motorized shades pay for themselves in about 2 years in energy savings, keeping cooling costs down.

Not sure I am hurrying to install them in the homes I decorate in Victorian Flatbush, as I like the more traditional window hardware for our vintage aesthetic.  For these applications it would be for convenience rather than energy savings. There is a 30-50% increase in costs over regular window treatments which could be prohibitive if not offset by energy savings.


Rock Paper

Comments Off on Rock Paper Written on March 14th, 2012 by
Categories: Decorating Ideas, Olive Green
Tags: , , , ,

Countertop Stone AlternativeI first  heard about Richlite in  a materials class while I was studying Sustainable Design at FIT. It is basically layers and layers of compressed paper soaked  and baked in a phenolic resin.  Richlite looks like a matte stone of some variety, and is incredibly tough and heat resistant.  Yet it can be cut by a wood working shop (My cabinet maker trimmed it to my specified size).  It has a greater spanning strength than stone as well.  My supplier, Anthony Brozna from Eco Supply in Richmond, Virginia, tells me that a 1”slab can cantilever over 30” and gives designers a lot more flexibility than stone. I chose basic black, though Richlite comes in a range of subdued colors.

Detail of Richlite Material


While I was testing the product for my client, I  tried abusing and staining a handful of samples. The material seemed impervious.  I have heard complaints that Richlite scratches easily, but the small surface scratches that I see lend to its character, and the beauty of it is that it can be sanded down with an orbital sander and 150 grit sand paper and refinished with their rejuvenator. My supplier has given me a few squares to try out for lamp bases in place of marble.  I will need to get a carbon tipped drill bit and hope to try them out.

Alternative to Stone Counter

The Richlite site has information for getting LEED points through the use of their product.  While Richlite has been around for many years, it has recently grown more popular with the rising interest in sustainability.  A similar product, and newer to the market, is PaperStone.  It also comes in fabulous colors and their advertising brochure proclaims them “The Countertop with a Conscience”.


Suitcase Storage

Comments Off on Suitcase Storage Written on March 6th, 2012 by
Categories: Decorating Ideas, Olive Design
Tags: , , ,

Studio StorageI always get comments on my storage solution in the studio.  I stack vintage suitcases I have collected and have easy access to my endless caches of “stuff”. Lengths of trim, samples of passementerie, vintage fabrics, carpet samples….easily and neatly stowed in  plain site.  I always thought I would get fancy and hang luggage tags on them to identify the contents, but never get around to that level of Martha-ness.Open Suitcases

I like the vintage suitcases with fabric and leather trim best, but also admire the antique leather ones which are often such great colors.  I gave one to my friend Maritza to put on top of the custom Armoire that we had built for her bedroom.  It was the perfect match to the cherry stain of the Armoire.  In order to make her room look better, we needed to stack a dresser, closet and storage cubby into one unit.  By using the suitcase on top, we managed to wring every last bit of storage space from that corner.Armoire with Suitcase


Tivoli Mercantile and the Amazing Technicolored Chalkboard

Comments Off on Tivoli Mercantile and the Amazing Technicolored Chalkboard Written on February 15th, 2012 by
Categories: Decorating Ideas
Tags: , , , ,

Color Chalkboard PaintChalkboard doesn’t need to be the black or green from school days of yore. While I was upstate this weekend, I went to this wonderful store called Tivoli Mercantile in Red Hook, New York.  They carry Hudson Paint, which features chalkboard paint in amazing colors.  Pinks!  Blues!  Chalkboards have all new possibilites, if you were hesitant about creating a blackboard door or wall (see previous post) because the black was a little bit overpowering, now you have many more options.Color Chalkboard

Tivoli Mercantile also carries paint developed for doors and floors as well as a primer.  I’m going to try the Lime Paint, which the company describes in their brochure as- “one of the world’s oldest paint formulas mixed with today’s best technology.  Lime is our liquid stone.  It is naturally anti-fungal, breathable and zero VOC.  Lime can be used in interior or exterior applications and produces a matte textured patina specific to the surface it is applied to.  Revive your home with one of the most natural paints available.”

Color Chalkboard

The paint is manufactured for them in a factory in the Hudson Valley.

Its so great finding small stores with niche products, Tivoli Mercantile had all kinds of interesting gadgets and clothes, besides their proprietary paint. If you’re trekking upstate, worth a visit!  5 East Market Street, Red Hook, New York.


Fun Framing Ideas

Comments Off on Fun Framing Ideas Written on February 8th, 2012 by
Categories: Decorating Ideas, Olive Blog
Tags: , , , ,

Fun Framing IdeasOnce you have filled up the front of the fridge, sometimes the Kid’s art needs to move onto the walls, and there comes a time when you want something a little fancier than scotch tape on the corners to hang it.  Then it’s hard to decide which pieces and the stuff just keeps on coming…

I developed for one of my clients a set of frames that can beautifully showcase your young Artists best work, and then, easily opened up to change out the artwork with a new piece.  I use metal turn-buttons on the back instead of fitting the artwork with points or brads.  You can change the look whenever a new batch comes home from school.  Best of all the artwork looks amazing when it’s showcased in a good-looking frame, and looks great on your walls.  Buy real wood frames for this project, as the pressboard varieties don’t take the hardware well, and won’t be as successful.  The wood grabs the screws better, and the frames are sturdier.

Fun Framing Ideas

See pics for tools and hardware needed.  I recommend plexi for safety.

A client I visited the other day, had a great display of framed work.  She used inexpensive frames from Ikea to showcase interesting papers that she had purchased.  Often grouping a set of framed pieces will function like a larger piece of art.

Fun Framing Ideas

She used them over the bed, which creates the visual drama of a headboard, and the white frames match the bedroom scheme. The same idea is used over the stairs, in black frames.  It’s an inexpensive way to get visual interest on the walls.  And as you are not invested heavily into it, you can feel free to change at whim.

Fun Framing Ideas


In Praise of Checkerboards

Comments Off on In Praise of Checkerboards Written on January 30th, 2012 by
Categories: Decorating Ideas, Olive Design
Tags: , , , , , ,

I had occasion to visit  an American Legion post this weekend, for a memorial for my father.  When I went down to the service kitchen I was impressed by just how cool it was- all because of the incredibly fabulous checkerboard floor.

Checkerboard Kitchen Floor

I took a shot of the floor with Maureen, one of the lovely Auxillary ladies who was helping with the food for the service.  I love the way a checkerboard floor, made from even the most mundane material (linoleum or paint), can transform a space  into something fun and dynamic.

The laundry room floor photo was taken while I was visiting a friend.

Checkerboard FloorI was impressed by the great color scheme (it matched my scarf perfectly), how the time was taken to make these inexpensive tiles in a utility room return more than their money’s worth in great design.


Designs on Wood

Comments Off on Designs on Wood Written on January 17th, 2012 by
Categories: Decorating Ideas, Olive Design, Olive Green
Tags: , ,

After a film crew unceremoniously sanded off my teal blue kitchen floor, with its aqua checkerboard, I was left with a somewhat unlovely- but natural-looking wood floor.   I didn’t miss the fabulous teal color I had painted as much as I did the pattern on top.  So I designed a checkerboard ”rug” to drop on top of the polyurethaned wood.  It gives me the pattern fun, but is easy to maintain.  When  the next film crew that used my kitchen (see it in the pilot show of “a Gifted Man”) damaged the floor- it was easy to paint back in a few tiles without re-doing the whole thing!

As the floor was an awkward shape, I designed an area with the size squares that I had in mind and positioned it on the floor with a same-color border all around.  It makes it way easier than dealing with the awkward edges of the room that do not lend themselves to extending a checkerboard across the whole thing.

I took the opportunity, when the floor was redone, to switch to a water based finish.  With today’s new technology the finish is just as sturdy as the oil based variety, dries faster and is way less toxic than its alkyd brethren.

I have used natural floors as the backdrop for other floor patterns, it makes a great textured ground and hides blemishes and mess better than a plain two-colored pattern.


The Amazing Instant Chalkboard Door

Comments Off on The Amazing Instant Chalkboard Door Written on January 11th, 2012 by
Categories: Decorating Ideas
Tags: , , ,


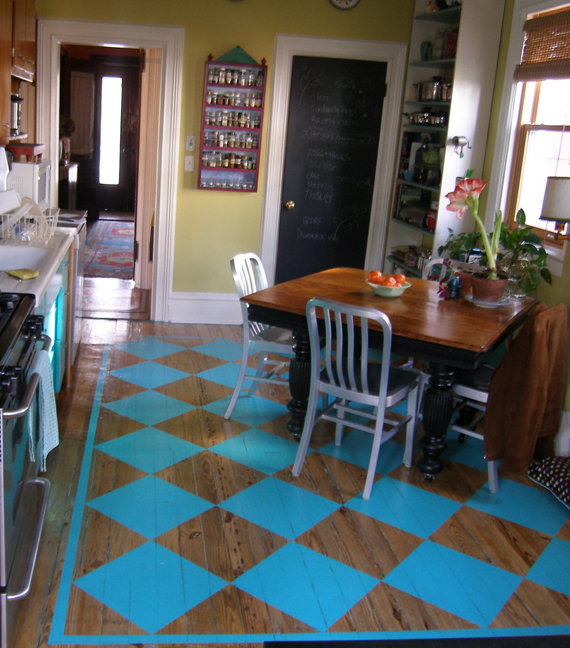
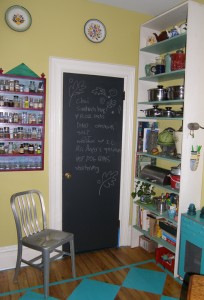
Keep your revolution in communication and personal digital devices, I’ll take The Amazing Instant Chalkboard Door any day!

Some elbow grease, primer, and blackboard paint have transformed my drab pantry portal into iDoor! Okay, maybe it’s not that amazing, but it is handy, handsome and heaps of fun to have an old-school chalkboard in the kitchen!

Those pesky grocery lists that slip off the fridge are a thing of the past. Now after a disappointing trip to the pantry, I write down the missing items right on the door. Obviously I can’t bring the door to Fairway, but when I copy the list down before I go, I take the time to organize it, so that items in the same aisle are listed near each other. I don’t want to see parsley on the list when I have already cleared meats and dairy!

Doors are great places for Instant Chalkboards. I painted one in a girl’s room that is used for messages, schedules and doodles. In another application I spec’d a chalkboard area in a co-op building’s playroom. It was a low cost, quick solution. Size can be easily adapted to the site. If you have a kids play area and an accessible wall, you can make the chalkboard size to suit the space. To give it more oomph you can even add some trim molding to form a frame around your chalkboard.

Any very smooth paintable surface will do. I recommend a quick sand with an orbital sander, but you sand by hand if you prefer; more muscle, less dust.
Once you sand, apply a primer. My current favorite, as recommended by my excellent painter, Christine Hughes, is a product called Stix. It has great adhesion, and receives the paint beautifully. I have heard several contractors and my paint supplier rave about this stuff.

When the primer is dry (follow instructions on the can for drying times) apply the blackboard paint. According the experts, “be careful not to over-coat and don’t go back and “work” an area, just touch up uneven sections with the second coat.” I‘m not sure what happens when the chalkboard paint is “overworked”, but it can’t be good. Apply the second coat the next day. Once it’s painted, give it a few days to cure. I like to leave it for a whole weekend.

I keep my chalk in a cup by the door, but you can buy a drawer pull and turn it upside down to hold a few pieces right on the door. It’s fun, inexpensive and unexpected, and the pop of black paint can be really interesting…although you might have to explain how to use this device to your kids!