In Praise of Checkerboards

Comments Off on In Praise of Checkerboards Written on January 30th, 2012 by
Categories: Decorating Ideas, Olive Design
Tags: , , , , , ,

I had occasion to visit  an American Legion post this weekend, for a memorial for my father.  When I went down to the service kitchen I was impressed by just how cool it was- all because of the incredibly fabulous checkerboard floor.

Checkerboard Kitchen Floor

I took a shot of the floor with Maureen, one of the lovely Auxillary ladies who was helping with the food for the service.  I love the way a checkerboard floor, made from even the most mundane material (linoleum or paint), can transform a space  into something fun and dynamic.

The laundry room floor photo was taken while I was visiting a friend.

Checkerboard Floor
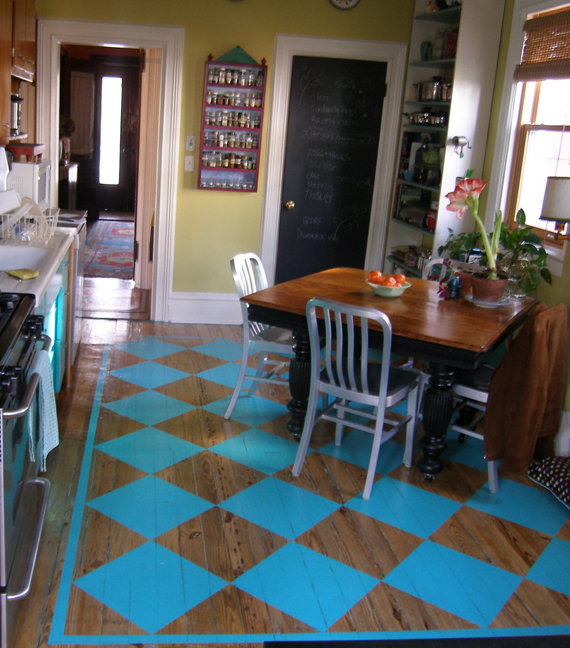
I was impressed by the great color scheme (it matched my scarf perfectly), how the time was taken to make these inexpensive tiles in a utility room return more than their money’s worth in great design.


Designs on Wood

Comments Off on Designs on Wood Written on January 17th, 2012 by
Categories: Decorating Ideas, Olive Design, Olive Green
Tags: , ,

After a film crew unceremoniously sanded off my teal blue kitchen floor, with its aqua checkerboard, I was left with a somewhat unlovely- but natural-looking wood floor.   I didn’t miss the fabulous teal color I had painted as much as I did the pattern on top.  So I designed a checkerboard ”rug” to drop on top of the polyurethaned wood.  It gives me the pattern fun, but is easy to maintain.  When  the next film crew that used my kitchen (see it in the pilot show of “a Gifted Man”) damaged the floor- it was easy to paint back in a few tiles without re-doing the whole thing!

As the floor was an awkward shape, I designed an area with the size squares that I had in mind and positioned it on the floor with a same-color border all around.  It makes it way easier than dealing with the awkward edges of the room that do not lend themselves to extending a checkerboard across the whole thing.

I took the opportunity, when the floor was redone, to switch to a water based finish.  With today’s new technology the finish is just as sturdy as the oil based variety, dries faster and is way less toxic than its alkyd brethren.

I have used natural floors as the backdrop for other floor patterns, it makes a great textured ground and hides blemishes and mess better than a plain two-colored pattern.


The Amazing Instant Chalkboard Door

Comments Off on The Amazing Instant Chalkboard Door Written on January 11th, 2012 by
Categories: Decorating Ideas
Tags: , , ,


Keep your revolution in communication and personal digital devices, I’ll take The Amazing Instant Chalkboard Door any day!

Some elbow grease, primer, and blackboard paint have transformed my drab pantry portal into iDoor! Okay, maybe it’s not that amazing, but it is handy, handsome and heaps of fun to have an old-school chalkboard in the kitchen!

Those pesky grocery lists that slip off the fridge are a thing of the past. Now after a disappointing trip to the pantry, I write down the missing items right on the door. Obviously I can’t bring the door to Fairway, but when I copy the list down before I go, I take the time to organize it, so that items in the same aisle are listed near each other. I don’t want to see parsley on the list when I have already cleared meats and dairy!

Doors are great places for Instant Chalkboards. I painted one in a girl’s room that is used for messages, schedules and doodles. In another application I spec’d a chalkboard area in a co-op building’s playroom. It was a low cost, quick solution. Size can be easily adapted to the site. If you have a kids play area and an accessible wall, you can make the chalkboard size to suit the space. To give it more oomph you can even add some trim molding to form a frame around your chalkboard.

Any very smooth paintable surface will do. I recommend a quick sand with an orbital sander, but you sand by hand if you prefer; more muscle, less dust.
Once you sand, apply a primer. My current favorite, as recommended by my excellent painter, Christine Hughes, is a product called Stix. It has great adhesion, and receives the paint beautifully. I have heard several contractors and my paint supplier rave about this stuff.

When the primer is dry (follow instructions on the can for drying times) apply the blackboard paint. According the experts, “be careful not to over-coat and don’t go back and “work” an area, just touch up uneven sections with the second coat.” I‘m not sure what happens when the chalkboard paint is “overworked”, but it can’t be good. Apply the second coat the next day. Once it’s painted, give it a few days to cure. I like to leave it for a whole weekend.

I keep my chalk in a cup by the door, but you can buy a drawer pull and turn it upside down to hold a few pieces right on the door. It’s fun, inexpensive and unexpected, and the pop of black paint can be really interesting…although you might have to explain how to use this device to your kids!


Grassless

1 Comment » Written on July 10th, 2011 by
Categories: Uncategorized

My Garden and the Grassless Adventure

I have been in my house for about 14 years, slowly turning our fixer upper into what most folks say is a pretty nice place. I started on the outside about 5 years later, when I had gotten past the worst of the disasters inside. ( We won’t get into the film crew that turned my house BACK to a fixer upper for a movie, so we could relive some of that in a highly speeded up version…)

There were the ancient shrubberies out front, with bare packed dirt around them, and a scruffy front yard with patchy grass on both sides of the walk. This was tended by a yard service that regularly trimmed and mowed for the elderly woman who lived here, but she had long since lost either the interest or ability to do any active gardening. The first few years I tried a few things, put in a few bushes, cut the grass, planted some annuals. Most of the bushes keeled over, the annuals were lackluster, but it was the grass I found most frustrating. I decided that grass was the gardeners’ example of the Law of Diminishing returns. The more work I put into it, I got only the smallest improvement in outcome.

A few things became clear: many of my neighbor’s lawns were yard service productions, which is also known as “Better living through Chemistry.” I didn’t want to put that much synthetic fertilizer into the ground, and so I didn’t use any chemical enhancement, or weed killers. I also didn’t want to get into the heavy water usage that lawns seemed to require. From TURF WARS The Battle Over the American Lawn by Evan Ratliff:

Lawn opponents of all strains cite studies quantifying the cost of Americans’ love affair with grass. Depending on conditions, a 25-by-40-foot yard can drink up to 10,000 gallons of water each summer. In some areas of the Western U.S., lawns account for 60 percent of urban water use. Keeping America’s grass perfectly cropped requires 38 million lawnmowers, most of which use two-stroke engines that generate as much pollution in an hour as a car does during a hundred-mile trip. Each year, Americans apply more than 70 million pounds of pesticides to their lawns, some of which seeps into groundwater, threatening wildlife and human health.

But another factor besides the political/environmental- my yard just didn’t really have enough light to have great grass, and the plantings that I had picked out for it were unsuitable. I thought that I was a serial killer of shrubbery, but it was just not having the right information about what plants to use.

I got help. My gardening friend Holly Noury from …a little Flower helped me start the first grassless corner where I nipped off the darkest part of the yard and put in some hostas and just gave up the part of the yard that ended up as grassless anyway. I let that go a few years. Then another gardening friend helped me take it to the next level, and has been helping ever since. Tracey Hohman helped me dig up the whole side of the yard and enrich the soil. Working out from Holly’s corner, she put in a perennial garden that was amazing. Shade plants! Shrubbery that could take low light conditions! What a concept! We bordered it with pink cobblestones to hold the dirt in place.

On the other side of the yard I started putting in hostas ,shrubs, and planting annuals, gradually pulling out the garden foot by foot until all I had left was a 3 foot strip of grass. But this year I decided it was time to finish what I started. I have now finished yanking out the last bits of grass, my photos show the project under way. Once the myrtle takes, will send a picture of the flourishing ground cover! My rotary lawn mower is nearly superfluous, next year the driveway’s grass ribbon will complete the project.

Happy Gardens.

Salvaging a damaged caned chair

Comments Off on Salvaging a damaged caned chair Written on June 10th, 2011 by
Categories: Olive Blog

I like fixing stuff, and resurrecting lost causes.  Most notably I make my line of lamps from bits and bobs and vintage pieces, and turn my attentions to furniture when it’s broken down.  But one thing I have no idea how to fix is caned furniture.  Which is a shame, because I really like it.  But if you live in a busy household with pets and kids and the occasional film crew wreaking havoc, caned chairs can be a bit…temporary.  I have a few of them in the basement waiting for attention.  I really liked the chairs in the dining room, except for that foot-sized issue in the corner.


caned chair

Recaning it would probably be pricey, and I currently don’t have anyone in my rolodex that could do it.  And maybe such a fragile thing was not the best idea for my household.  So I took it to Das, my favorite local upholsterer, with a piece of fabric, and converted it to an upholstered dining chair.


the finished chair

I think it looks really great,  and it was a nice way to save the chair.  It has inspired me to pull the other 2 family antique chairs out of the basement!  They will be getting the same treatment soon.  While I had hesitated before to take such liberties with my grandmother Olive’s nice walnut side chair, now that I see how great this one came out, I think it would be nicer to change it and use it then leave it languishing in the basement with the busted cane.

Olive Blog

5 Comments Written on May 27th, 2011 by
Categories: Olive Blog

olive design studio pictureAlthough this is my first foray into the real blogosphere, I have been informally “blogging” with friends and clients for decades! I love to share information about what I see and find in the marketplace…things like green alternative building materials and cleaning products, paint and home furnishings. I cruise a stack of shelter and trade magazines every week and gather ideas, trends, products, and accessories that I think could be game-changers in your home or mine. I am on a first name basis with area upholsterers, painters, plasterers and installers of every stripe. I live in a great old house with loads of character and charm, but it has to stand up to a daily assault from two kids and two pets! If you read my blog regularly there will be plenty of pearls of wisdom to help you live more beautifully, comfortably, and conscientiously. Have a great Memorial Weekend and tune in next week!