Posts Tagged ‘#interiordesign’

Easy Peasy Deconstructed Roman Shades

Comments Off on Easy Peasy Deconstructed Roman Shades Written on November 11th, 2016 by
Categories: Uncategorized
Tags: , , , , ,

It started as an upcycle…

blog-pic-1

My previous tenant left some beige wool felt curtains that she had made. The fabric came from the upscale menswear company where she worked; I was delighted at the uncommonly nice goods I had inherited! I pictured them as unlined roman shades: a super simple, minimal window treatment. I also knew that I wanted them to be removable for dry cleaning.

shade-rod

Traditionally, roman shades are installed and left in place until they are unbelievably filthy, or the fabric starts falling apart, or a combination thereof.  Making them removable for cleaning keeps them fresh and attractive longer, and when it’s time to replace the shades you can re-use the dustboard or hardware.

Roman shades are usually attached to a dust board: a piece of wood which holds the cord lock and the eye-hooks that guide the strings. The shade fabric is stapled to the top of the dust board , which is then screwed into the window frame, allowing the fabric to cascade down the front.

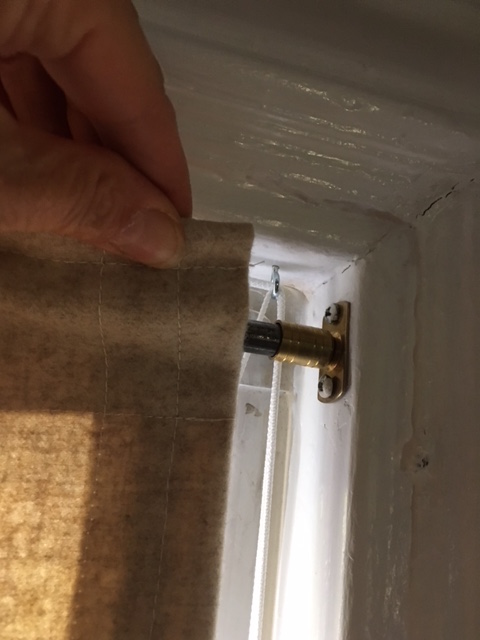
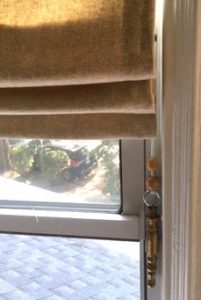
I eliminated the dustboard altogether and hung the shades like a curtain on a rod, with the eyehook/string guides attached right to the window frame.


Making the shades:

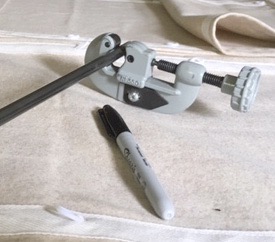
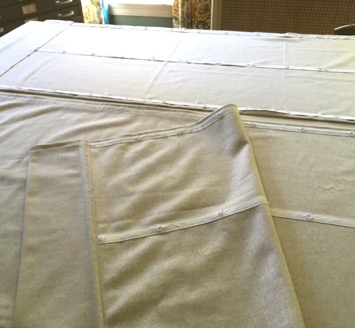
Roman shades work on a string lift system.  The rings are evenly space on the back of the shades in vertical and horizontal rows, and a bar at the bottom keeps the shade in place and helps guide the fabric to fold into pleats as the fabric lifts. I re-purposed some lamp pipe as my weight bar at the bottom and some lamp finials for the shade pulls.

blog-pic-pipeblog-pic-finial


I thought I would save some time by using “ring tape” and sewing that to the back of the fabric instead of sewing on the rings by hand. The “ring tape” creates a stripe which becomes a part of the design of the shade.  Sewing the tape on straight, I have learned, is as much a challenge as sewing on the rings; best to do this only if you like the look of the tape.

blog-pic-ring-tape

The shades are trim and translucent, giving a warm glow when they are down in daytime and privacy at night.  The fabric is now on its third life from its initial purchase for clothing, so it’s been diverted from the waste stream a few times already and should last a long while as clean-able shades.

Big Funky Floor Lamp Requested

Comments Off on Big Funky Floor Lamp Requested Written on October 4th, 2016 by
Categories: Uncategorized
Tags: , , ,


img_4731

img_4737-copy

Once I got the Emergency Lamp Call, I put together a collection of floor lamp parts from various pieces in the basement, on a sturdy base.  The finishes were incompatible but easily brought into line with a can of white gloss paint and many light coats over the course of the day, which gave it a rich, glossy and even finish.

img_4741

I stripped down a huge vintage silk shade and recovered the frame. The call was for Big. Here is where it pays to be discerning in your junk; with older lamp shades, the silk shades are the most tattered, as silk tends to split over time while the synthetics are often intact. But the frames for silk shades are meticulously wrapped with a thin ribbon, to allow the shade fabric to be stitched on – and if you are recovering the shade, you can take advantage of this feature.

Sidebar… I tried wrapping a shade frame once with the special ribbon for it, and don’t advise trying this at home!

In a time-savings coincidence, the fabric I used was a funky skirt I bought at a street fair, having found that the times I would ever wear this skirt were exactly Never. I left the gathering elastic at the top, and stitched in a hem at bottom to anchor to the shade frame. Then, I pinned the fabric up tight to the top band, allowing the elastic to set the gathers; otherwise there would be way too much material to sort out. I stitched the skirt to the ribbon-wrapping of the frame. Lastly, I cut off the top of the skirt and finished the shade with glued-on banding to hide the cut edge and stitching.

Best part is the surprise effect when it lights up; by day it’s a graphic contrast, by night the dark and light sheer layers created a soft moiré pattern and beautiful diffused light…

  img_4694  img_4723  img_4705-copy


Talking To My Socks

Comments Off on Talking To My Socks Written on August 6th, 2016 by
Categories: Decorating Ideas, Olive Blog, Uncategorized
Tags: , , ,

IMG_3768

The bestselling Marie Kondo book, The Life-Changing Magic of Tidying Up, has a lot of fans and detractors.  I decided to read it after several people,whose opinions and values I shared,  had recommended it,  Many of her practical suggestions include organizing like-things together, storing things for optimal access and viewing, and letting go of extraneous things; all which resonated with me.  Sometimes her suggestions were outside my normal scope of organizing activity; e.g., in one section, she instructs you to roll your socks in pairs and to thank them for their service in taking care of your feet.  As one article I read about the book noted, if millions of Americans have read it, and even a fairly small percentage follow her edicts, then we have  thousands of people in America talking to their socks.

My take-away on the book was the way she makes you think about organizing, which trumps any misgivings I have about speaking with my garments or household items.  While I first thought some of her methods were a little extreme, or too sentimental (or inaccessible, as far as time commitments goes), I eventually found that I began looking at spaces and re-organizing them without over-thinking it after reading her book. It feels more organic now.  Thus far, the changes have been ‘sticking’ so I feel like the book is as much about the mindset as it is about the practical advice. I manage organizing with minor incursions through cabinets, drawers and closets instead of the wholesale practice she recommends.  It works for me, as waiting until I had time to do a major sweep through all the cabinets or all the closets would be like waiting for Godot.

The before and after of my pantry;  I am no longer embarrassed if the door is left open-

IMG_3730


…Before…


                   IMG_3771 (1) …After

Then, I moved onto bigger game.  A client’s heavily used laundry room in a co-housing space for 5 adults had fallen into disrepair and was choked with clutter.  I was able to offload many bags of trash, and organize other items into the laundry room so shared items are easily found; this opened up space in other parts of the apartment for much needed storage.

Before..

Laundry  Laundry before 2Laundry before 4


After…

Laundry after 1   Laundry after 2   Laundry after 4   Laundry after 3

Best of luck in your organizing endeavors! Tell your socks I said hello.